UserMap Documentation
This documentation is now deprecated, the user amp is now replaced by the OSGeo Member map. See: OSGeo_Member_Map_documentation.
The following documentation shows how to display a map of your location or a map of all users in the Osgeo 'user database'.
It also shows how to include yourself in the aforementioned database. Please give feedback here.
Add yourself to the usermap
There are two ways to add yourself to the usermap.
By using the parser tag
You can define your location parameters, as they are shown in the userMap by including a parser Tag on your user page (User:YourUsername). The tag has the following syntax:
{{#umSetParam: long|lat|City, Country|Wiki username|Full name}}
The coordinates are in decimal degrees, x|y format. If the User doesn't exist, or the parameters are changed and the tag is placed on the users userpage, the database will be updated. For example (on the wiki page: User:Christian_Willmes, an other example with different name and wiki name : yjacolin):
{{#umSetParam: 6.92|50.95|Cologne, Germany|Christian Willmes|Christian Willmes}}
By using umAdmin
You can include the usermap Admin tool with the '#umAdmin' parser tag on your wiki userpage (User:YourUsername).
The syntax is:
{{#umAdmin: YourUsername}}
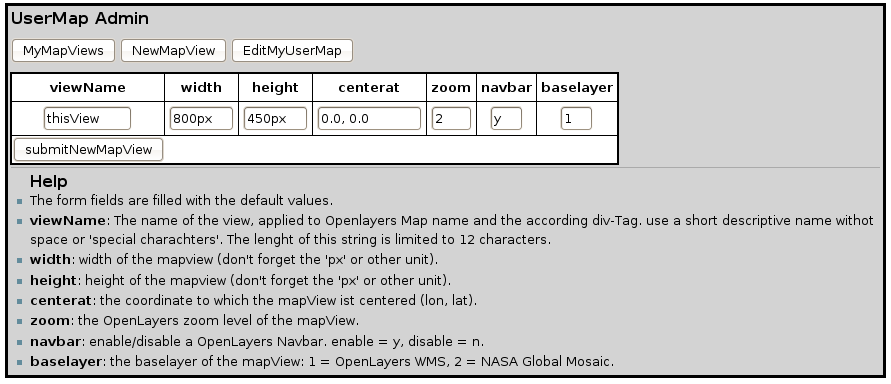
When you edited your page accordingly you will see a small menu with three options:
- MyMapViews
- NewMapView
- EditMyUserMap
It looks like this:
By clicking on 'EditMyUserMap' two forms are displayed on the page.
- The first is for entering/editing your userMaps MapView parameters (width, height, zoom, navigationbar and baselayer).
- The second is for entering/editing your Location parameters (Your full name, Location name, latitude and longitude.
It is relatively self explaining. :) By clicking on the submit button of the according form the values are inserted or updated in the database. By clicking again on EditMyUserMap you can see how your Map looks like with the given parameters.
Display a map of a users home location
To display a map of the home location of a user include the following tag into a wikipage:
{{#umUserMap: username|width|height|zoom|baselayer|navbar}}
The 'width' and 'height' parameters are optional. If not provided, standard values of 'width=400px', 'height=250px' and 'zoom=4' are applied. "baselayer" is a number between 1 and 4, where 1 = <Openlayers WMS>, 2 = <OSM Mapnik>, 3 = <OSM TilesAtHome>, 4 = <OSM CycleMap>, at default (if not set) its set to 1 (OpenLayers WMS). "navbar" is a boolean, where 'y' enables th OPenLayers Navigationbar and 'n' disables it (which is the default value).
For example:
{{#umUserMap: Christian Willmes|400px|400px|7|2|y}}
generates this map:
{{#umUserMap: Christian Willmes|400px|400px|7|2|y}}
base layers
As described above but here again to have it structured:
- 1 = OpneLayers WMS (by Metacarta)
- 2 = OSM Mapnik
- 3 = OSM TilesAtHome (Osmarenderer)
- 4 = OSM CycleMap
Display a map of all users home locations
To display a map of all wiki users include the following tag:
{{#umAllUserMap: width|height|zoom|centerat|baselayer|navbar}}
By combination of the zoom and centerat parameters you can focus any region of the map.
The parameters are optional. If no parameters are provided, standard ones will be used (width=800px, height=450px, zoom=2, centerat=0, 0).
For example with an focus on Europe:
{{#umAllUserMap: 800px|450px|4|7, 51|4|y}}
{{#umAllUserMap: 800px|450px|4|7, 51|4|y}}
MapViews with umAdmin
By using the usermap Admin tool (described above), you can define several MapViews.
Creating a Mapview with umAdmin
By clicking on the option "NewMapView", a form will be shown, where you can enter the parameters of the mapView. It is relatively self explaining, but a short help is also displayed at the bottom of the page.
Showing the created mapView on a wiki page
Every MapView gets a unique ID you can include you mapView wit the '#umMapView' parser tag. The syntax is:
{{#umMapView: ID}}
For example the following mapView Nr.1
{{#umMapView: 1}}
defines a view of Europe: {{#umMapView: 1}}
Help
- If you have any problems displaying the map, add yourself to the database or find a bug please contact Christian Willmes.
- Here you can also request a new feature or report an error.
See also
- OSGeo Member Category where the member map is displayed

