Training Material for UN Open GIS Spiral 1
Introduction
The OSGeo UN Committee promotes the development and use of open source software that meets UN needs and supports the aims of the UN. Following a meeting between OSGeo Board of Directors and the UN GIS team at FOSS4G in Seoul, Korea in September 2015, the Committee has mainly worked on the UN Open GIS Initiative, a project “...to identify and develop an Open Source GIS bundle that meets the requirements of UN operations, taking full advantage of the expertise of mission partners including partner nations, technology contributing countries, international organisations, academia, NGOs, private sector. The strategic approach shall be developed with best and shared principles, standards and ownership in a prioritized manner that addresses capability gaps and needs without duplicating efforts of other Member States or entities. The UN Open GIS Initiative strategy shall collaboratively and cooperatively develop, validate, assess, migrate and implement sound technical capabilities with all the appropriate documentation and training that in the end provides a united effort to improve the effectiveness and efficiency of utilizing Open Source GIS around the world.” (more details at [ https://wiki.osgeo.org/wiki/UnitedNations_Committee]).
Purpose of this document
This educational material is designed as a step-by-step software learning guide for the users of the UN GeoSHAPE platform for data collection. Geoshape is a free and open source geospatial platform created from various open source projects. You can visit www.geoshape.org for more information. This Quick Start provides a guide on how to 1. Create, edit and share critical data on an integrated dynamic map in near real time. 2. View map updates by users from anywhere in the world and 3. Use GeoSHAPE exchange in connected and disconnected environments.The training material is intended to provide all the materials needed to run a 5 day course on UN GeoSHAPE platform for data collection. The course is structured with content to suit novice, intermediate and advanced users.
Target Audience
The primary target audience is, therefore, professionals at local, regional, national or international agencies especially those in developing countries.
License
This educational material has been authored by Ketty Adoch under the framework of the UN OSGeo Challenge, with the mentorship of Christina Hupy from Boundless who sponsored the production of this material. The material is licensed under a Creative Commons Attribution-Share Alike 3.0 Unported License.
Module 1: Core Concepts
- Vector Data: It is the type of map data that is represented as points, lines, polygons on the map.
- Raster Data: It is any sort of pixel data or digital image where each pixel corresponds to a continuous location or area on the earth’s surface.
- Coordinate Reference Systems: CRS or SRS (Spatial Reference System) are used to describe real-world positional locations on a map.
- Map projection: Map projection is the systematic transformation (mathematical computation) that can be used to project a point represented as latitude, longitude on the surface of a sphere into locations on a plane.
- Rendering: Rendering to tiles refers to the process of drawing vector or raster data to a png or jpeg which can then be sent to a web or mobile client (web-browser, or mobile app).
- Development: Developers build web applications on top of a web stack which is comprised of an operating system (usually in reference to the server’s operating system), programming language(s) for client and server side code, a database, and a server (such as Apache or IIS).
- Web stack and Web Applications: The web-client application refers to the main portion of the web application that a user interfaces with from a browser. The client-side portion of the application talks to the server (requests and sends data), performs rendering and any client-side calculations.
Module 2: Components of GeoSHAPE Exchange for data collection
GeoSHAPE is the integration of a geospatial portal (GeoNode), a web mapping client (MapLoom), and a mobile application (UN AnyWhere)
- Geonode: GeoNode is the main user facing web application and geospatial portal.
- Maploom: Maploom is the web mapping client which has been embedded in Geonode. Maploom allows you to view, create and edit geospatial features. It also supports connecting to any other server that supports OGC standards: wms, wfs, wcs.
- GeoServer: GeoServer sits behind GeoNode and serves all the vector and raster data. You can directly interact with Geoserver by going to the following endpoint and using the admin credentials used in GeoNode: https://<qualified ip address or domain name>/geoserver
- GeoGig: Geoserver supports numerous datastores one of which is postgres/postgis. During upload, you can choose to upload your layer into a GeoGIG datastore instead of PostGIS. Geogig is a distributed version control system inspired by Git/Github which has been designed for Geospatial vector data.
- UN AnyWhere: UN AnyWhere is an Android mobile application which is designed to work with GeoSHAPE. The GeoSHAPE server can work without being connected to the internet and each mobile device can also work without being connected to the GeoSHAPE server.
- Tileset: This is a package that contains all tiles (images) for an Area of Interest. For example, if you want to use UN AnyWhere in Yumbe, Uganda, your Area of interest will be the boundaries of Yumbe. The tileset will need to contain every single image at every zoom level. There are typically 18 zoom levels.
Open the Geoshape web page by typing the domain name or ip address in the web browser and login. The Sample data that accompanies this resource is freely available and comes from the following sources:
- Water Point data from OpenStreetMap using the Overpass API
(http://www.openstreetmap.org/)
- Administrative boundaries through downloading district boundary, from Data.ug
(http://www.data.ug/)
- The combined sample data is in shapefile format and may be downloaded from here
Module 3: Using GeoSHAPE Exchange for data collection
Lesson 1: Basic User (MapLoom Basic)
Create New Map
1. Click the ‘Map’ tab on the menu bar and select ‘Create Map’ from the drop down menu
Add different layers for example from your server, other relevant servers or partners
2. Click the Add Layers (+) button in the Layer’s field.The Add Layers Window will open.You can then search for a layer of interest using the Title of the Layer as a Keyword.
3. Click from the listed records to select the layers of interest.
4. Click ‘Add Layers’Bold text to add the selected layers to the Map. Information about the two layers is rendered on the New Map.
Save the New Map with an appropriate name
5. Click the Save button in the Layers field and Enter an appropriate title and abstract for the New Map then click Save. The title makes your map discoverable when other users search for the map using the title.
Draw Geometry, Edit attributes of the new feature and Save
6. In this case, we want to add information to the Water point layer. Click the Zoom In (+) or Zoom Out (-) button on the right hand side of GeoShape Exchange page. We’ll add new water point data and edit attribute information, hence the need to Zoom In (+), such that the point is placed in the ‘right’ location. Click the Add feature () button, Click the correct location on the map.
7. Click the Accept feature button and go on to Edit the attributes of the new feature. Or Click the Cancel feature button to remove the added feature.
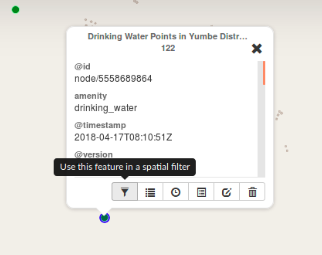
8. Click the feature to view feature information embedded in a pop up window. Additional options include; Use the feature in a spatial filter, View Table, Show History, Edit Attributes, Edit Geometry and Delete Feature.
Show/Hide layers
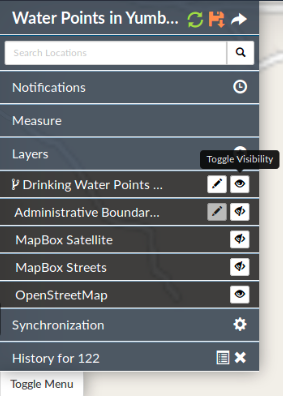
9. Toggle Visibility function allows you to turn a layer’s display on and off without having to delete the layer from the map. Click the ‘Toggle Visibility’ button to Show or Hide layers.
Lesson 2: Advanced User
Lesson 2.1: Add Layers to GeoSHAPE
1. Click the Data tab on the menu bar and Select Upload Layer menu item 2. Browse to the folder on your local machine which has the data you wish to upload 3. Select all files or select the zip file
Lesson 2.1.1: MapLoom Advanced
Change basemap
Searching
View the history of a feature/layer=
Managing Conflicts
Lesson 2.1.2: Synchronizing with other repos and distributed servers
Refresh layers after editing
Synchronisation from the server of a partner organisation
Synchronization from a remote instance
Merge two repos


